
I’m cross posting this tutorial here for anyone who isn’t following gameboymacro.com!
Items you will need:
- Nintendo DS (Original)
- Rosin core solder
- Soldering Iron
- Hot Glue Gun
- Tri-wing Screw Driver
- Small Phillips head screw driver
- 330 OHM 0805 Surface Mount Resistor (or standard 330OHM resistor though this tutorial focuses on using a SMT resistor)
- 30 Guage Kynar Wire (Optional)
- Tweezers (optional but recommended)
Step 1 – Remove the back of the DS
This is a fairly simple step. Using the tri-wing screwdriver, removed the screws from the points marked in red below.

After the screws are removed simply lift the rear of the shell to reveal the innards of the DS. Once opened, remove the screws marked in red.
Once removed disconnect the Wifi antenna cable, and the ribbon cables marked in red. Do not remove the motherboard yet, first lift up the bottom screen large ribbon cable to reveal two smaller cables below it. Remove those as well. These two ribbon cables are removed by pulling the brown locking mechanism forward. Do it slowly and softly, it is fragile (if you break it you can fix it with somewhat of a workaround). Once these are all removed you can remove the shoulder buttons and lift the motherboard from the shell.

-

- Make sure to disconnect these cables!

Step 2 – Solder the resistor
With the motherboard out you are ready to solder the resistor! Get your 330 OHM resistor. If you are using an SMT resistor I would recommend getting some tweezers for this, as they are freaking tiny.
Soldering these is difficult (mine are rarely perfectly straight. The easiest way I’ve found is to pool solder on your two points, then lay one side of the resistor on the pools. When you heat the first side with your soldering iron it will suck the resistor in. Repeat with the other side and it will do the same, then the resistor will be level and soldered.
The points you are soldering to are marked in red below, they are LEDC2 and LEDA2. The orientation of the resistor doesn’t matter.
-
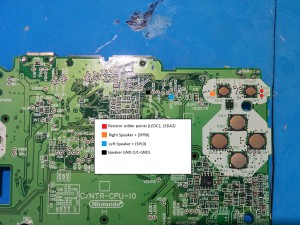
- Solder to the points marked above. The speaker points will be referenced later.

-
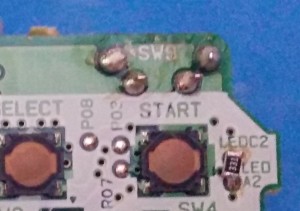
- Once finished it should look something like this.

That is all you need to do to run the DS headless. You can plug the bottom screen in and test it if you’d like.
In this tutorial I am only installing one speaker (the right one). If you would like to use both left and right then just solder the the left speaker point as well.
First, remove the covers from the areas marked below, then remove the screws.
-

- Remove the covers marked in red
-

- Now remove the screws

After the screws are removed pry the back of the screen off to reveal the inside.

Remove the screws holding the two small boards in. Now you have two options here. If you have 30 gauge kynar wire you can just use that, if not, remove the longer black and red wires connecting these two boards and solder them to the speaker as seen below.

You can then either wrap this connection in electrical tape, or just put a dab of hot glue on it to insulate it.
Now you can remove the top screen housing entirely. Remove the screw seen below

Once removed, you just have to wiggle the top housing off of the hinge and sort of finesse the ribbon cable for the top screen out. It really doesn’t matter if you rip the ribbon cable unless you plan on using the screen in something else.
Step 4 – Installing Speakers
Now you’re ready to install the speakers, reference the image below again for the proper points. This tutorial only installs the right speaker.
Solder your speakers to points:
- Right Speaker + (Red): SPR0
- Left Speaker + (Red): SPL0
- Speaker GND (Black): U1-GND
-

- Pull the square away to reveal another cylinder. Then pull that out.


You can now test it if you’d like. Plug the bottom screen back in. It should work like this:
Step 5 – Glue the speaker down
Now, flip the motherboard over to reveal the back. This part is super simple. If you have a hot glue gun, plug it in and wait for it to heat up. Then glue the speaker down in the area marked below. Double-sided tape will also work if you don’t have a glue gun.

-

- Hot speaker placement yo.

That’s all. It should work now! Soon I will have a tutorial up for cutting and filling the case. But that’s all you need to do for the bare minimum. If you don’t need a speaker you could just put it back together and play like it is, just with headphones.
Hi – thanks so much for the tutorial. It’s great to able to give the old hardware new life 🙂
It’s kinda amazing how brittle the plastic in the old DS phat has become over time, the casing broke just about everywhere when I took it apart :S
Anyway, following the tutorial, I don’t see a mention of putting the wifi antenna back. Is that required to run the DS?
Nope! The wifi antenna isn’t needed unless you want wifi for some reason.